


Repainting exterior render is one of the fastest ways to transform the appearance of a property. A fresh coat of quality masonry paint can brighten tired walls, improve kerb appeal and provide additional weather protection.
However, the success of any exterior painting project depends almost entirely on the preparation carried out beforehand. Even the most expensive paint can fail prematurely if applied to dirty, damaged or damp render.
The complete preparation process involves much more than simply washing the walls. Cleaning, drying, repairing and priming all play vital roles in creating a long-lasting finish.
At Softwashing UK, we regularly prepare render for decorating by safely removing biological growth and contamination using professional soft washing methods. Proper preparation gives decorators the clean, stable surface they need to achieve outstanding results.
Why Preparation Is More Important Than Painting
Many homeowners focus on choosing the right paint colour while overlooking the condition of the render underneath.
Exterior paint relies on strong adhesion to the substrate. If the render is contaminated, cracked or damp, that bond becomes significantly weaker.
Poor preparation can lead to:
- Peeling paint
- Bubbling
- Blistering
- Patchy finishes
- Water ingress
- Premature repainting
Taking time to prepare the surface correctly can extend the lifespan of the finished paintwork by many years.
Step 1 – Inspect the Entire Property
Before any cleaning begins, carry out a detailed inspection of the render.
Look for:
- Cracks
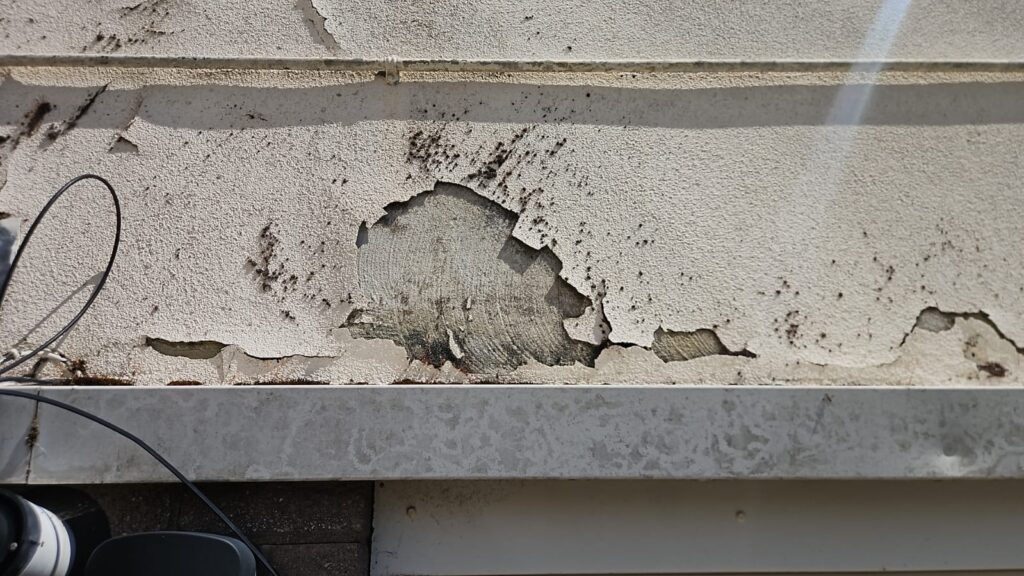
- Hollow sections
- Loose render
- Impact damage
- Failed sealant
- Water staining
- Green algae
- Red algae
- Black mould
- Lichen
- Efflorescence
Cleaning often reveals problems that were previously hidden beneath dirt and biological growth.
| Inspection Item | Why It Matters |
|---|---|
| Cracks | Allow water penetration |
| Loose render | Paint will fail |
| Green algae | Prevents paint adhesion |
| Red algae | Causes staining and moisture retention |
| Mould | Can grow beneath paint |
| Lichen | Difficult to paint over |
| Damp patches | Indicates underlying issues |
Step 2 – Choose the Correct Cleaning Method
Not all render should be cleaned in the same way.
Many people assume pressure washing is the quickest option, but high-pressure cleaning can damage delicate render finishes and force water deep into the surface.
Professional soft washing is often the preferred solution because it removes biological contamination while using significantly lower pressure.
| Cleaning Method | Suitable for Most Render? | Risk of Damage |
|---|---|---|
| Soft washing | ✔ Yes | Low |
| Low-pressure rinse | ✔ Yes | Low |
| Steam cleaning | Sometimes | Moderate |
| Pressure washing | Often unsuitable | High |
The aim is to clean the render without causing unnecessary damage.
Step 3 – Remove Biological Growth
Biological growth is one of the biggest causes of premature paint failure.
Render commonly suffers from:
- Green algae
- Red algae
- Moss
- Lichen
- Black mould
Simply painting over these contaminants does not solve the problem.
Instead, they continue holding moisture against the wall and may eventually stain or damage the new paint.
Professional soft washing removes visible contamination while treating remaining spores to reduce future regrowth.
Step 4 – Allow the Render to Dry
Once cleaning has been completed, patience becomes extremely important.
Although the surface may appear dry within hours, moisture can remain trapped inside the render.
Typical drying times vary depending on:
- Weather
- Temperature
- Humidity
- Wind
- Render type
- Cleaning method
| Render Type | Typical Drying Time After Soft Washing |
|---|---|
| Silicone render | 2–5 days |
| Acrylic render | 2–5 days |
| Monocouche render | 3–7 days |
| Cement render | 5–10 days |
| Older porous render | Up to 14 days |
Painting before the render has fully dried increases the risk of blistering and peeling.
Step 5 – Check for Moisture
Professional decorators often use moisture meters before applying primer.
Signs that render may still be damp include:
- Dark patches
- Uneven colouring
- Cold surface
- Persistent staining
- Damp smell
Moisture trapped beneath paint is one of the most common causes of coating failure.
Step 6 – Repair Damaged Areas
Cleaning frequently exposes defects that require attention before decorating.
These may include:
- Hairline cracks
- Failed expansion joints
- Missing sealant
- Small holes
- Loose render
- Impact damage
Never assume paint will hide these problems.
Instead, repair them properly before moving on to the next stage.
| Common Defect | Repair Required? |
|---|---|
| Hairline cracks | ✔ Yes |
| Missing sealant | ✔ Yes |
| Loose render | ✔ Yes |
| Hollow render | ✔ Yes |
| Minor chips | ✔ Yes |
| Dirt staining | Removed during cleaning |
Step 7 – Sand and Smooth Repairs
Once repairs have cured, lightly sand where necessary.
The goal is to create a smooth transition between repaired areas and existing render.
This helps:
- Produce a consistent finish
- Prevent visible repair patches
- Improve primer adhesion
- Reduce paint consumption
Always remove sanding dust before priming.
Step 8 – Check the Weather Forecast
Exterior decorating depends heavily on weather conditions.
Ideal painting conditions include:
- Dry weather
- Mild temperatures
- Low humidity
- Little chance of rain
- Moderate airflow
Avoid painting immediately before heavy rain or during periods of high humidity.
| Weather | Suitable for Painting? |
|---|---|
| Warm and dry | ✔ Excellent |
| Mild and overcast | ✔ Good |
| Very humid | Usually avoid |
| Rain forecast | ✖ No |
| Frost | ✖ No |
| Strong winds | Sometimes unsuitable |
Step 9 – Decide Whether Primer Is Required
Not every render requires primer, but many projects benefit from one.
Primer can improve:
- Adhesion
- Uniform colour
- Paint coverage
- Surface stability
- Durability
New repairs often absorb paint differently from existing render.
Applying primer helps create an even finish across the entire wall.
Step 10 – Select the Correct Primer
Different render systems may require different primer types.
Always follow the paint manufacturer’s recommendations.
Factors influencing primer choice include:
- Render material
- Previous coatings
- Surface porosity
- Existing paint condition
- Exposure to weather
Choosing the wrong primer can reduce the lifespan of the paint system.
Step 11 – Mask and Protect Surrounding Areas
Before painting begins, protect nearby surfaces.
These include:
- Windows
- Doors
- Brickwork
- Paths
- Driveways
- Gutters
- Plants
- External lighting
Good preparation reduces clean-up afterwards.
Step 12 – Carry Out a Final Inspection
Before opening the first tin of paint, inspect the render one final time.
Check that:
- The render is clean
- No green algae remains
- No red algae remains
- Repairs have cured
- The surface is dry
- Primer has cured where required
- No dust remains
Only then should painting begin.
Common Preparation Mistakes
Many premature paint failures result from shortcuts taken during preparation.
| Mistake | Possible Result |
|---|---|
| Painting damp render | Blistering |
| Leaving algae behind | Early staining |
| Skipping repairs | Cracks return |
| Pressure washing delicate render | Surface damage |
| Ignoring drying times | Peeling paint |
| Using incorrect primer | Poor adhesion |
How Long Does Full Preparation Usually Take?
Preparation should never be rushed.
A typical domestic project may look like this.
| Stage | Approximate Time |
|---|---|
| Inspection | Half day |
| Soft washing | 1 day |
| Drying | 3–10 days |
| Repairs | 1–2 days |
| Repair curing | Several days |
| Priming | 1 day |
| Painting | Weather dependent |
The exact schedule depends on property size and weather conditions.
Why Professional Cleaning Makes Decorating Easier
Professional soft washing provides far more than cosmetic improvements.
It creates a clean, stable surface that decorators can work with confidently.
Benefits include:
- Safe removal of green algae and red algae
- Lower risk of damaging render compared with high-pressure washing
- More consistent cleaning across large elevations
- Improved adhesion for primers and masonry paints
- Identification of defects before painting starts
- Reduced likelihood of contamination affecting the finished coating
By starting with a professionally cleaned surface, decorators spend less time dealing with hidden problems and more time producing a high-quality finish.
Pre-Painting Checklist at a Glance
Use this checklist before any exterior painting project begins.
| Task | Complete |
|---|---|
| Inspect render | ☐ |
| Remove green algae | ☐ |
| Remove red algae | ☐ |
| Remove mould and lichen | ☐ |
| Professionally soft wash render | ☐ |
| Allow adequate drying time | ☐ |
| Check moisture levels | ☐ |
| Repair cracks | ☐ |
| Repair damaged render | ☐ |
| Sand repaired areas | ☐ |
| Remove dust | ☐ |
| Check weather forecast | ☐ |
| Apply suitable primer if required | ☐ |
| Protect surrounding areas | ☐ |
| Carry out final inspection | ☐ |
Why Investing in Preparation Pays Off
Repainting render is a significant investment. Depending on the size of the property, professional decorating can cost anywhere from several hundred pounds to several thousand pounds. Cutting corners during preparation often leads to costly remedial work much sooner than expected.
Investing in thorough preparation helps:
- Improve paint adhesion
- Achieve a more uniform finish
- Extend the lifespan of exterior coatings
- Reduce future maintenance costs
- Protect the render from unnecessary damage
- Maximise the value of professional decorating work
A clean, dry and properly repaired surface provides the ideal foundation for any masonry paint system. Professional preparation from Softwashing UK ensures the render is free from green algae, red algae and other contaminants, giving decorators the best possible starting point before priming and painting.
How Different Types of Render Affect Preparation
Not all render systems behave in the same way, so understanding what you’re working with can help determine the level of preparation required.
Newer render systems are often designed to be more flexible and water repellent, while older cement-based renders tend to be more porous and susceptible to moisture absorption.
| Render Type | Typical Characteristics | Preparation Considerations |
|---|---|---|
| Silicone render | Water repellent and flexible | Gentle cleaning and thorough drying |
| Acrylic render | Durable with good flexibility | Check for existing coating adhesion |
| Monocouche render | Through-coloured finish | Repair chips carefully before painting |
| Cement render | Highly porous | Longer drying time and careful moisture checks |
| Painted render | Existing coating present | Inspect for peeling or flaking paint |
Identifying the render type before starting work allows decorators to select the most appropriate preparation methods.
Don’t Ignore Previously Painted Render
Many properties have already been painted at least once.
Before repainting, inspect the existing coating carefully.
Signs that previous paint has failed include:
- Peeling edges
- Flaking surfaces
- Bubbling
- Cracking
- Chalking (powdery residue when rubbed)
- Uneven colour fading
If old paint is poorly bonded, applying another coat on top simply transfers the problem to the new finish.
Any loose material should be removed before priming or repainting.
Why Clean Render Improves Paint Coverage
Professional cleaning doesn’t just improve adhesion—it can also reduce the amount of paint required.
Dirty render absorbs paint unevenly because contaminants interfere with the coating.
Benefits of starting with a clean surface include:
- More even absorption
- Better colour consistency
- Fewer missed patches
- Improved opacity
- Reduced risk of visible staining showing through
While the exact amount varies between properties, proper preparation can often reduce unnecessary additional coats.
Areas That Are Often Forgotten
During preparation it’s easy to focus on the main walls while overlooking smaller details.
These areas should also be inspected:
- Window reveals
- Door surrounds
- Under window sills
- Expansion joints
- Pipe penetrations
- Meter boxes
- Air vents
- Areas beneath roof overhangs
These sections often remain damp for longer because they receive less direct sunlight and airflow.
They can also harbour green algae, red algae and mould even when the larger wall areas appear relatively clean.
Why Timing Your Project Matters
Planning exterior decorating during favourable weather conditions can make a significant difference to both the preparation process and the finished result.
Summer is often the busiest period for exterior painting because:
- Longer daylight hours
- Lower average rainfall
- Faster drying conditions
- More stable temperatures
However, extremely hot weather isn’t always ideal either. Paint applied to render that’s baking in direct midday sun can dry too quickly, making it harder to achieve a consistent finish.
Many professional decorators prefer working during mild, dry conditions where temperatures remain steady throughout the day.
Preparing Render Is an Investment, Not an Expense
It’s tempting to save time by skipping parts of the preparation process, particularly if the render doesn’t appear excessively dirty.
In reality, preparation is what protects the investment you’re making in exterior decorating.
Professional cleaning from Softwashing UK removes green algae, red algae and other contaminants without the unnecessary risks associated with aggressive pressure washing. Combined with careful repairs, adequate drying time and suitable priming, this creates the ideal surface for exterior paint to perform at its best.
Spending a little longer on preparation today can help your freshly painted render maintain its appearance for many years, reducing the likelihood of premature repainting and helping you get the greatest value from your decorating project.